
Michael Anderson
Former journalist turned tech writer with a passion for helping professionals enhance productivity through AI.
Introduction
Have you ever created a presentation and felt something was missing? Your text is great, but the slides look a little… flat. The difference between a simple presentation and a professional one often comes down to the small details.
You don’t need to be a graphic designer or use expensive software to make your slides look polished. Google Slides has powerful, built-in tools that can help your images pop, make your text more readable, and guide your audience’s attention.
The best part? All these tools are hidden in one simple panel. This guide will show you exactly where to find them and how to use them, step-by-step.

Finding Your Image Toolkit: The “Format Options” Panel
Almost every image effect in Google Slides lives in a single place: the Format Options panel. Once you know how to open it, you’ve unlocked all the tools you’ll need.
First, click on the image you want to edit. Once it’s selected, you can open the panel in three easy ways:
-
From the Toolbar: Look for the “Format options” button in the toolbar at the top of your screen.
-
From the Menu Bar: Go to the top menu and click
Format>Format options.

-
From a Right-Click: Simply right-click on your image and choose “Format options” from the dropdown menu.
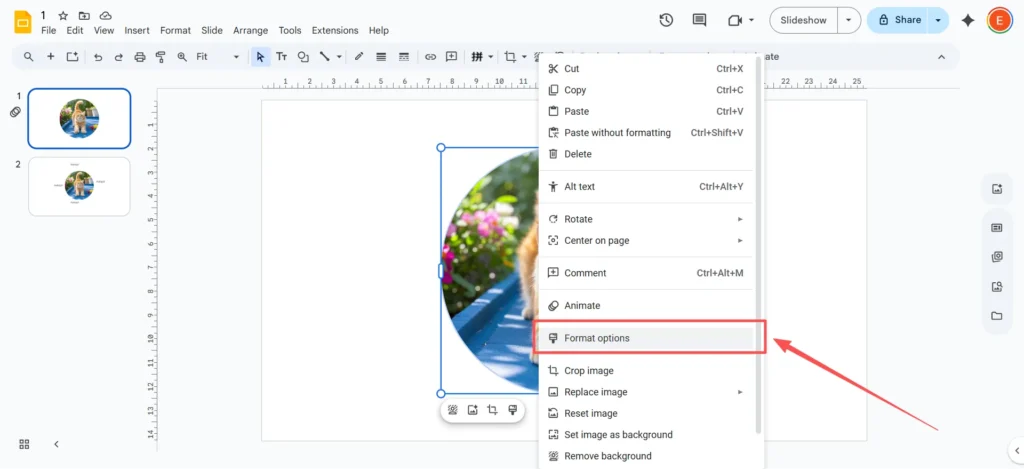
A new sidebar will open on the right side of your screen. This is your new command center for image editing.
The Step-by-Step Guide to Basic Image Effects
Let’s walk through the most useful effects in that panel, one by one.
How to Adjust Transparency (Opacity)
This setting controls how “see-through” your image is. It’s one of the most useful tools for making your slides look professional.
-
Select your image and open the Format Options panel.
-
Click the arrow to expand the Adjustments section.
-
You will see a slider labeled “Transparency” or “Opacity”. (Don’t worry, they both do the exact same thing!)
-
Drag the slider to the right. You’ll see your image start to fade. 0% is fully solid, and 100% is fully invisible.

When to use it: This is perfect for fading a large image so you can use it as a background. It makes your text on top much easier to read. You can also use it to create a faint “watermark” effect with your logo.
How to Adjust Brightness & Contrast
If your photo is too dark or looks “washed out,” you can fix it right in Google Slides.
-
In that same Adjustments panel, find the sliders for “Brightness” and “Contrast”.
-
Brightness: Drag this slider to the right to make a dark photo brighter.
-
Contrast: Drag this to the right to make the dark parts of your image darker and the light parts lighter. This makes a “flat” image “pop”.
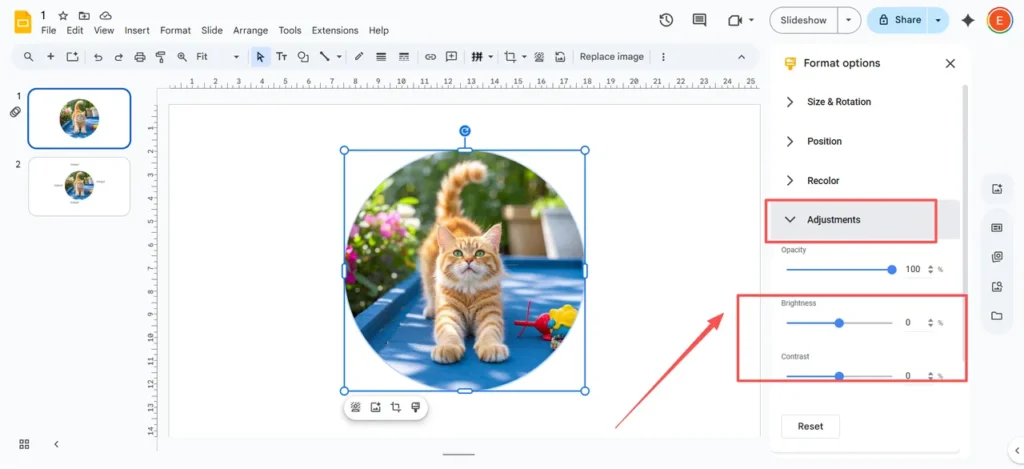
When to use it: This is a lifesaver when you have a great photo that was just taken in bad lighting. You can also use these tools to intentionally wash out an image (lower the contrast, raise the brightness) to help your text stand out.
How to Add a Drop Shadow
A drop shadow adds a small shadow behind your image, making it look like it’s lifting off the slide. It’s a simple way to add depth and a professional touch.
-
In the Format Options panel, check the box next to Drop Shadow.
-
Pro-Tip: When you first check the box, you might not see much! The default shadow is tiny. To make it look good, click the small arrow next to “Drop Shadow” to open the settings.
-
Here, you can adjust:
-
Color: The shadow’s color (it’s best to stick with black or a dark gray).
-
Transparency: How light or dark the shadow is.
-
Angle: The direction the “light” is coming from.
-
Distance: How far the shadow is from the image. Increase this to make it more obvious.
-
Blur Radius: This is the most important one. Increase the blur to make the shadow look soft and natural.
-

When to use it: Use this on headshots, product photos, or any image you want to stand out from the background.
How to Add a Reflection
This effect adds a “mirror” or “wet floor” look below your image. It gives a sleek, modern, and high-tech feel.
-
In the Format Options panel, check the box next to Reflection.
-
Just like with the shadow, click the arrow to expand the options.
-
You can adjust the Transparency (how faded it is), Distance (how far it is from the image), and Size (how much of the image is reflected).

When to use it: This looks great on a title slide with a company logo or a featured product photo.
How to Recolor an Image
This tool applies a color filter over your entire image, like turning it black and white (grayscale) or giving it an old-fashioned “sepia” tone.
-
In the Format Options panel, click to expand the Recolor section.
-
A drop-down menu will appear with lots of different color presets.
-
Click on any of them to see the effect applied instantly. If you don’t like it, just select “No recolor” from the top of the list.
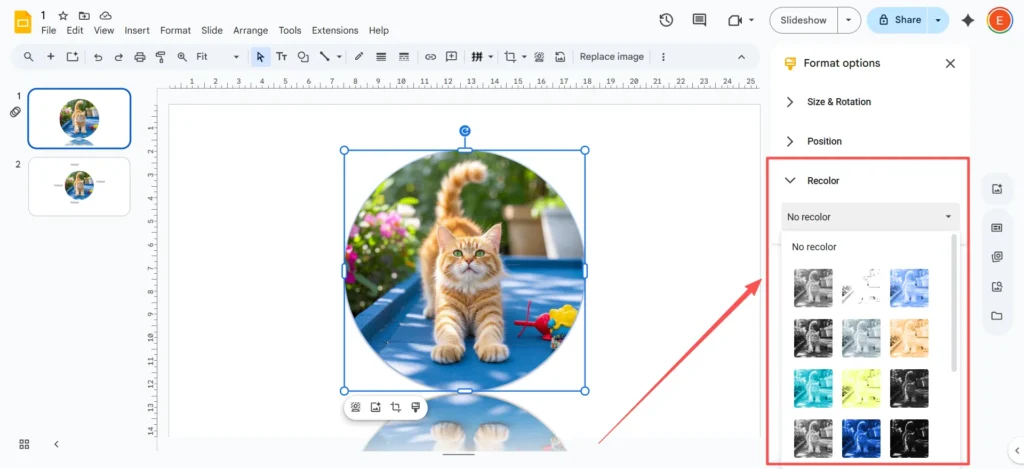
When to use it (Pro-Tip): This tool is more than just a fun filter; it’s a branding tool. If your company’s brand color is blue, you can apply a blue recolor preset to any stock photo. This instantly makes the photo match your presentation’s theme and look incredibly unified and professional.
Creative Tips and Advanced Tricks (That Go Beyond the Basics)
Once you’ve mastered the basics, you can try these creative workarounds for effects that Google Slides doesn’t officially support.
The “Soft Edge” Workaround: How to (Sort of) Blur an Image in Google Slides
Let’s get this out of the way: Google Slides does not have a “blur” button or a “feather” tool for images. This is one of the most common complaints, but there are two clever tricks to get a similar effect.
Workaround 1: The Faux-Blur (for Backgrounds) This is the quick and easy way.
-
Place your image on the slide.
-
Go to
Insert>Shapeand draw a rectangle over your image. -
Fill the shape with a solid color (like white or black).
-
With the shape selected, use the Format Options panel to make the shape semi-transparent. The image behind it will look faded and “blurry,” making your text on top easy to read.
Workaround 2: The Soft Edge “Halo” (The Best Trick) This trick fakes a soft, feathered edge on the image itself.
-
Click your image. In the toolbar, find the Crop icon. Click the small arrow right next to it.
-
Hover over “Shapes” and select a shape, like the Rounded Rectangle or Oval. This will “mask” your image.
-
Now, go to Format Options and add a Drop Shadow.
-
In the shadow settings, set the Distance to 0.
-
Slide the Blur Radius way up (try 20–30 px or more).
-
The result: You’ve created a soft, blurry “halo” around your image that makes the hard edge disappear. It looks just like a soft, feathered edge.
Beyond the Box: Using “Crop to Shape” (Masking) for Professional Layouts
That “Crop to Shape” tool we just used is one of the most powerful design tools in Google Slides. It lets you crop your picture into any shape, not just a square.
-
Select your image.
-
Click the arrow next to the “Crop” icon in the toolbar.
-
Hover over Shapes and choose a circle, arrow, hexagon, or any other shape.
-
Your image will be instantly masked inside that shape.
When to use it: This is the secret to getting away from “boring” slides. Instead of square photos, you can create a “Team” slide with everyone’s headshot in a perfect circle. You can also create a “magnifying glass” effect by layering a circle-cropped image over a dimmed, full-size version of the same image.
When You Need Great Design, Fast
As you can see, you can do a lot of design work in Google Slides, but it takes time. Faking a blur effect or creating custom callouts involves a lot of steps and clicks. What if you’re in a hurry and just need your presentation to look professional, fast?
This is where a tool designed for speed and simplicity can be a huge help. For busy professionals, students, or anyone who needs great-looking slides now, an AI-powered tool is a great alternative.
This is where AutoPPT can make a real difference. Instead of starting with a blank white slide and tweaking every single image, AutoPPT offers a rich library of beautiful presentation templates. These are made by professional designers, so the layouts, colors, and image effects are already perfect.
Even better, AutoPPT can generate an entire, polished presentation for you using AI. You just give it a topic (like “Quarterly Business Review”) or upload a Word or PDF document , and it creates a full slide deck for you in seconds. It’s the perfect choice for busy people who don’t have strong design skills but still need to deliver a high-quality presentation. It helps you save time and improve your work efficiency.
Quick Troubleshooting: Why Can’t I Edit My Image?
It’s a common problem: you click on an image, and you can’t select it, or the “Format Options” are grayed out. This is frustrating, but the fix is usually simple.
-
Problem: You can’t select the image at all.
-
Answer: The image is probably on the “Theme” or “Master” slide. This means it’s part of the presentation’s template.
-
How to Fix: Go to the top menu and click
View>Theme builder. You’ll find the image there, and you can edit or delete it.
-
-
Problem: You can select the image, but you can’t add effects.
-
Answer: The image has been set as the slide Background. You can’t add effects to a background.
-
How to Fix: Right-click the slide (not the image) and choose
Change background. You will need to remove it as a background and re-insert it as a normal image (Insert>Image) to add effects.
-
-
Problem: My image format isn’t supported.
-
Answer: Google Slides works great with standard formats like JPG, PNG, and GIF. It does not support vector files like SVG.
-
How to Fix: Before you upload your image, convert it to a PNG or JPG file.
-
-
Problem: My image disappears or shows an error.
-
Answer: This is usually a simple browser or internet glitch.
-
How to Fix: First, just try refreshing the page. If that doesn’t work, try clearing your browser’s cache or opening your presentation in an “Incognito” window.
-
Conclusion: Your Slides, Your Way
Now you know that the “Format Options” panel isn’t so scary. With just a few clicks, you can add a professional
Drop Shadow to make an image pop, use the Transparency slider to make text readable, or apply a Recolor filter to match your brand’s theme.You also know the “pro-tricks,” like how to combine masking and shadows to fake a soft edge.
But you also know that when you’re short on time or just don’t want to mess with sliders, a tool like AutoPPT is ready to help. It can do the heavy lifting, generating a beautiful, design-ready presentation for you in minutes.
Whether you love to get hands-on with every detail or you’d rather save time and focus on your message, you no longer have to settle for flat, boring slides. Go open your presentation, try adding a simple drop shadow to an image, and see the difference it makes.
Create worry-free presentations with AutoPPT . Turn your ideas into slides quickly—while keeping them 100% yours!
About AutoPPT: An easy use AI tool for students and professionals. Generate editable slides, customize designs, and focus on what matters—your unique ideas.

Autoppt: Generate presentations in 1 minute!
Start Free Trail Now